YA Social Sync
日本語EN
YA SOCIAL SYNC · USER GUIDE

A visual guide from first setup to pause, disconnect and cancellation

Each step explains what to do and shows what you can expect to see on screen. Google and Instagram authorization screens may vary slightly with provider updates and language settings.

Important: Connecting Google alone does not start automatic synchronization. Auto Sync is OFF by default and begins only after the client explicitly turns it ON in Sync Settings.
01

Before you start

  • An Instagram Professional (Business) account
  • A Google account that manages the target Business Profile
  • A YA Social Sync business account and annual subscription
STEP 1

Create your account and sign in

Register your company, contact name, email, billing country and password. Then sign in to enter the client workspace.

ActionCreate account → enter details → accept Terms → create account
Screen example

sync.yanda.ooo/register
YA Social SyncBusiness synchronization service
Create account
✓ Accept Terms
STEP 2

Confirm the annual plan and pay with Stripe

Confirm the number of licensed Google locations and the annual amount, then prepay the 12-month term through Stripe. Continue setup after payment is confirmed.

CheckLocation quantity, currency, annual total and renewal terms
Screen example
sync.yanda.ooo/billing
Annual subscription

Billing

12-month prepaid plan

Google location licenses × 1

Final amount shown before checkout

CONNECT
STEP 3

Connect Instagram Professional

From Connections, add Instagram accounts one at a time. Complete the Meta/Instagram authorization flow for the account you want to use.

Multiple Instagram accounts can be assigned to the same Google location.
YA Social Sync example
sync.yanda.ooo/connections
Authorized services

Connections

Instagram
InstagramNot connected
STEP 4

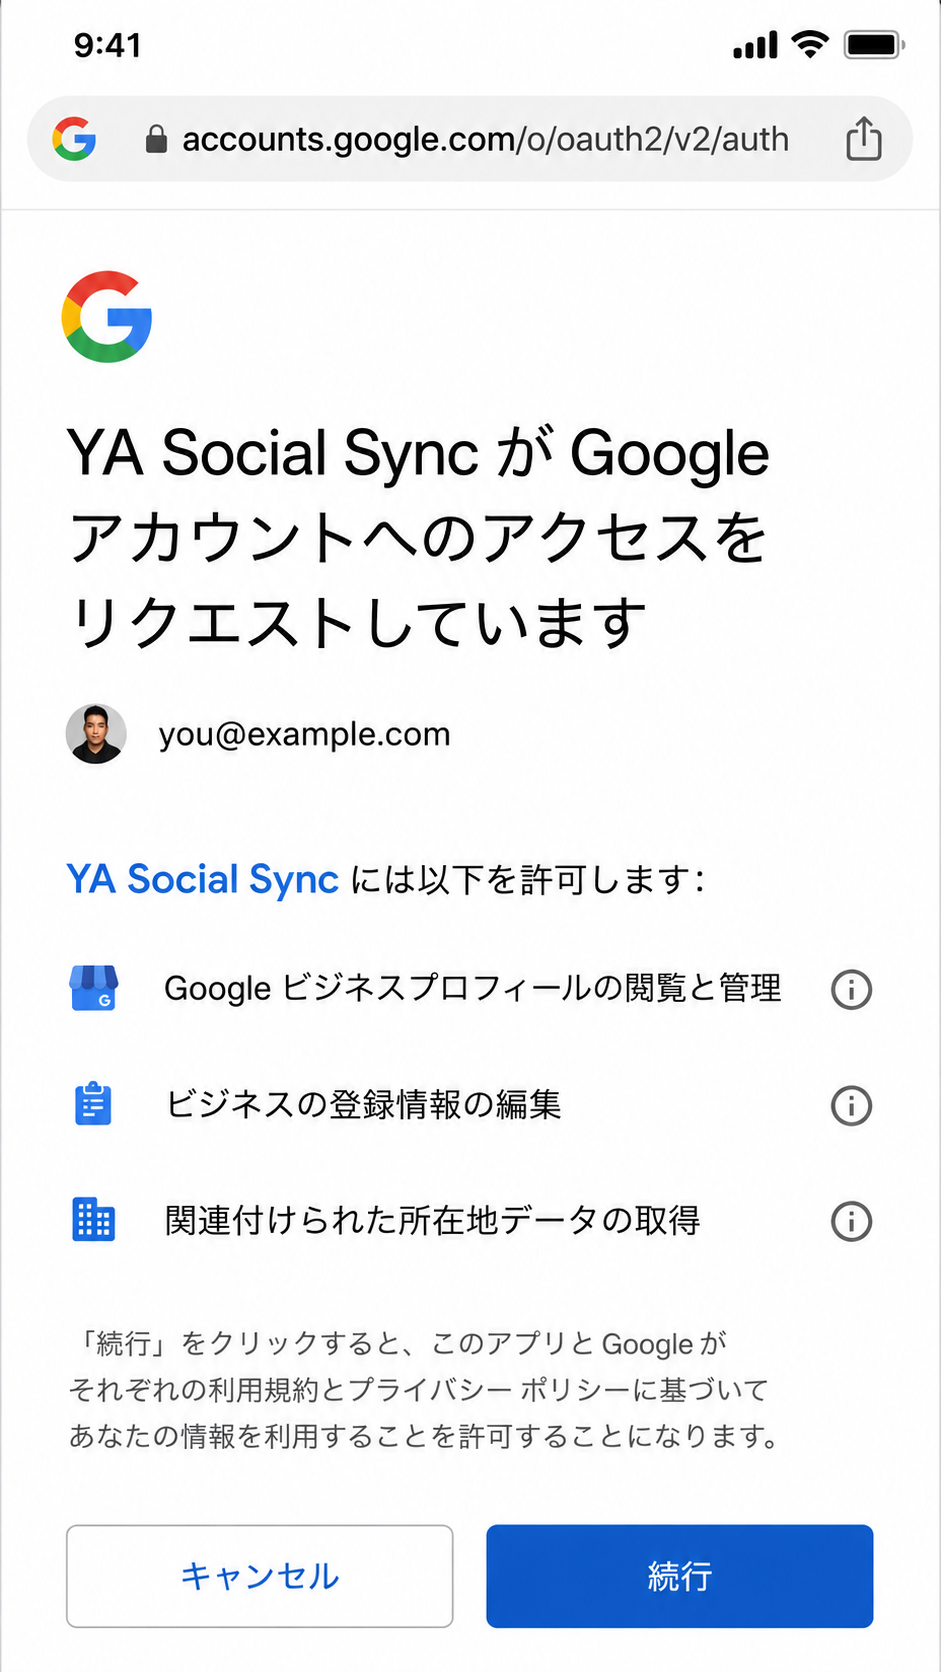
Authorize Google Business Profile with OAuth

Select Connect Google to open Google’s authorization screen. Choose the Google account that manages the Business Profile, review the requested permissions and select Continue.

ImportantGoogle OAuth authorization alone does not start Auto Sync.

The image below is an example. Google’s screen and wording can vary by language and Google updates.

Example Google authorization screen
Example Google OAuth authorization screen for YA Social Sync
Review the permissions and select Continue if you agree.
STEP 5

Select a Google location and assign Instagram

After Google is connected, refresh locations and add the target Business Profile from Locations. Select the Instagram account or accounts that should sync to that location.

Screen example
sync.yanda.ooo/locations

Add Google location

✓ @sample_instagram
AUTO SYNC
STEP 6

Auto Sync starts OFF

New accounts start with Auto Sync OFF. Even after Instagram, Google and locations are connected, YA Social Sync does not begin background automatic posting at this stage.

Automatic synchronization does not begin until the client explicitly enables it.
Sync Settings — OFF
sync.yanda.ooo/settings

Sync settings

Enable automatic synchronizationOFF by default
OFF

Google connection alone does not start syncing.

STEP 7

Review and explicitly enable Auto Sync

In Sync Settings, review the authorization notice, enable Automatic synchronization and save. Turning it ON authorizes YA Social Sync to automatically synchronize eligible content from connected Instagram accounts to the selected Google locations.

Prepare content for GoogleRemove Instagram hashtags is ON by default. Exclusion rules are evaluated first, then ordinary #hashtags are removed from the text sent to Google. The original Instagram post is not changed.
You stay in controlTurn the same setting OFF at any time to stop all automatic synchronization.
Sync Settings — ON
sync.yanda.ooo/settings

Sync settings

Enable automatic synchronizationON
Remove Instagram hashtagsClean caption before Google posting
ON
STEP 8

Monitor dashboard and sync history

Use the dashboard to check connection/setup status and Posts to review successful, failed or needs-attention synchronization history. Manual sync is also available when needed.

Screen example
sync.yanda.ooo/posts

Sync history

New Instagram postSuccessWeekend updateSuccessNew productNeeds attention
STOP & END
STEP 9

To stop immediately: turn Auto Sync OFF or disconnect

To stop automatic posting while keeping connections, turn Auto Sync OFF. To end access to Instagram or Google, disconnect the relevant service from Connections. When Google is disconnected, stored credentials are deleted and YA Social Sync also attempts provider-side revocation.

Pause / disconnect example
sync.yanda.ooo/connections

Connections

InstagramConnected
Google Business ProfileConnected
STEP 10

Cancel the next annual renewal

From Billing you can cancel the next annual renewal. This does not terminate the current prepaid 12-month term early. Service remains available until the end of the paid term.

If you want syncing to stop immediately, also use STEP 9 to turn Auto Sync OFF or disconnect.
Billing example
sync.yanda.ooo/billing

Subscription

Annual auto-renewal

Current paid term: Active

Service remains available through paid term end
STEP 11

Delete integration or account data

Settings provides controls to delete integration data or request account deletion. Deleting integration data removes OAuth credentials. Contract, payment and audit records that must be retained for legal/accounting purposes may be kept only for the necessary period.

Settings example
sync.yanda.ooo/settings

Account & data

USER CONTROL

Connections, Auto Sync and renewal remain under the user’s control

Google OAuthExplicit authorization
Auto SyncOFF by default; explicitly enabled
StopOFF / disconnect anytime
SubscriptionNext annual renewal can be cancelled